Converting CSV data to BUFR
Learning outcomes
By the end of this practical session, you will have:
- learnt to format CSV data for use with the default automatic weather station BUFR template
- learnt to use wis2box webapp to validate and convert sample data
- learnt about some of the common issues that can occur, such as incorrect units
Introduction
Comma-separated values (CSV) data files are often used for recording observational and other data in a tabular format. Most data loggers used to record sensor output are able to export the observations in delimited files, including in CSV. Similarly, when data are ingested into a database it is easy to export the required data in CSV formatted files. To aid the exchange of data originally stored in tabular data formats a CSV to BUFR converted has been implemented in the wis2box using the same software as for SYNOP to BUFR. In this session you will learn about using this tool through the wis2box web-application. Command line usage and customisation will be covered in a later session.
Preparation
Prerequisites
- Ensure that your wis2box has been configured and started, including the setting execution tokens
for the
processes/wis2boxandcollections/stationspaths. Confirm the status by visiting the wis2box API (http://<your-host-name>/oapi) and verifying that the API is running. - The tokens can be checked by logging in to the wis2box management container and entering the
command:
wis2box auth has-access-path --path processes/wis2box <your-token>where<your-token>is the token you entered. -
If the tokens are missing they can be generated with the following commands:
wis2box auth add-token --path processes/wis2box <token>
wis2box auth add-token --path collections/stations <token>
where token is the value of the token. This can be left blank to automatically generate a random token (recommended). - Make sure that you have MQTT Explorer open and connected to your broker.
Inspecting CSV data and BUFR conversion
Exercise 1 - the basics
The csv2bufr converter used in the wis2box can be configured to map between various tabulated input files, including CSV. However, to facilitate and make the use of this tool easier a standardised CSV format has been developed, targeted at data from AWS stations and in support of the GBON reporting requirements. The table below lists the parameters included in the format:
| Column | Units | Data type | Description |
|---|---|---|---|
| wsi_series | nan | Integer | WIGOS identifier series |
| wsi_issuer | nan | Integer | WIGOS issuer of identifier |
| wsi_issue_number | nan | Integer | WIGOS issue number |
| wsi_local | nan | Character | WIGOS local identifier |
| wmo_block_number | nan | Integer | WMO block number |
| wmo_station_number | nan | Integer | WMO station number |
| station_type | nan | Integer | Type of observing station, encoding using code table 0 02 001 (set to 0, automatic) |
| year | nan | Integer | Year (UTC), the time of observation (based on the actual time the barometer is read) |
| month | nan | Integer | Month (UTC), the time of observation (based on the actual time the barometer is read) |
| day | nan | Integer | Day (UTC), the time of observation (based on the actual time the barometer is read) |
| hour | nan | Integer | Hour (UTC), the time of observation (based on the actual time the barometer is read) |
| minute | nan | Integer | Minute (UTC), the time of observation (based on the actual time the barometer is read) |
| latitude | degrees | Decimal | Latitude of the station (to 5 decimal places) |
| longitude | degrees | Decimal | Longitude of the station (to 5 decimal places) |
| station_height_above_msl | meters | Decimal | Height of the station ground above mean sea level (to 1 decimal place) |
| barometer_height_above_msl | meters | Decimal | Height of the barometer above mean sea level (to 1 decimal place), typically height of station ground plus the height of the sensor above local ground |
| station_pressure | Pa | Decimal | Pressure observed at the station level to the nearest 10 pascals |
| msl_pressure | Pa | Decimal | Pressure reduced to mean sea level to the nearest 10 pascals |
| geopotential_height | gpm | Integer | Geoptential height expressed in geopotential meters (gpm) to 0 decimal places |
| thermometer_height | meters | Decimal | Height of thermometer or temperature sensor above the local ground to 2 decimal places |
| air_temperature | Kelvin | Decimal | Instantaneous air temperature to 2 decimal places |
| dewpoint_temperature | Kelvin | Decimal | Instantaneous dewpoint temperature to 2 decimal places |
| relative_humidity | % | Integer | Instantaneous relative humidity to zero decimal places |
| method_of_ground_state_measurement | code table | Integer | Method of observing the state of the ground, encoded using code table 0 02 176 |
| ground_state | code table | Integer | State of the ground encoded using code table 0 20 062 |
| method_of_snow_depth_measurement | code table | Integer | Method of observing the snow depth encoded using code table 0 02 177 |
| snow_depth | meters | Decimal | Snow depth at time of observation to 2 decimal places |
| precipitation_intensity | kg m-2 h-1 | Decimal | Intensity of precipitation at time of observation to 5 decimal places |
| anemometer_height | meters | Decimal | Height of the anemometer above local ground to 2 decimal place |
| time_period_of_wind | minutes | Integer | Time period over which the wind speed and direction have been averegd. 10 minutes in normal cases or the number of minutes since a significant change occuring in the preceeding 10 minutes. |
| wind_direction | degrees | Integer | Wind direction (at anemometer height) averaged from the caterisan components over the indicated time period, 0 decimal places |
| wind_speed | ms-1 | Decimal | Wind speed (at anemometer height) averaged from the cartesian components over the indicated time period, 1 decimal place |
| maximum_wind_gust_direction_10_minutes | degrees | Integer | Highest 3 second average over the preceeding 10 minutes, 0 decimal places |
| maximum_wind_gust_speed_10_minutes | ms-1 | Decimal | Highest 3 second average over the preceeding 10 minutes, 1 decimal place |
| maximum_wind_gust_direction_1_hour | degrees | Integer | Highest 3 second average over the preceeding hour, 0 decimal places |
| maximum_wind_gust_speed_1_hour | ms-1 | Decimal | Highest 3 second average over the preceeding hour, 1 decimal place |
| maximum_wind_gust_direction_3_hours | degrees | Integer | Highest 3 second average over the preceeding 3 hours, 0 decimal places |
| maximum_wind_gust_speed_3_hours | ms-1 | Decimal | Highest 3 second average over the preceeding 3 hours, 1 decimal place |
| rain_sensor_height | meters | Decimal | Height of the rain gauge above local ground to 2 decimal place |
| total_precipitation_1_hour | kg m-2 | Decimal | Total precipitation over the past hour, 1 decimal place |
| total_precipitation_3_hours | kg m-2 | Decimal | Total precipitation over the past 3 hours, 1 decimal place |
| total_precipitation_6_hours | kg m-2 | Decimal | Total precipitation over the past 6 hours, 1 decimal place |
| total_precipitation_12_hours | kg m-2 | Decimal | Total precipitation over the past 12 hours, 1 decimal place |
| total_precipitation_24_hours | kg m-2 | Decimal | Total precipitation over the past 24 hours, 1 decimal place |
The full file can be downloaded from: aws-full.csv
Now download the example for this exercise from the link below:
Inspect the expected columns from the table above and compare to the example data file.
Question
Examining the date, time and identify fields (WIGOS and traditional identifiers) what do you notice? How would today's date be represented?
Click to reveal answer
Each column contains a single piece of information. For example the date is split into year, month and day, mirroring how the data are stored in BUFR. Todays date would be split across the columns "year", "month" and "day". Similarly, the time needs to be split into "hour" and "minute" and the WIGOS station identifier into its respective components.
Question
Looking at the data file how are missing data encoded?
Click to reveal answer
Missing data within the file are represented by empty cells. In a CSV file this would be
encoded by ,,. Note that this is an empty cell and not encoded as a zero length string,
e.g. ,"",.
Missing data
It is recognised that data may be missing for a variety of reasons, whether due to sensor failure or the parameter not being observed. In these cases missing data can be encoded as per the above answer, the other data in the report remain valid.
Station metadata
The CSV to BUFR conversion tool has been developed as a standalone tool separate from the wis2box. As such, all the data to be encoded in BUFR must be present in the CSV file, including the station metadata like the location and sensor heights. In future versions the web-application will be updated to load the metadata from the wis2box API and to insert the values into the CSV, similar to the process used in FM-12 SYNOP to BUFR.
Even though all the metadata is contained within the CSV file the station metadata must still be registered in the wis2box for the message to be procesed.
Exercise 2 - converting your first message
Now that you have familiarised yourself with the input data file and specified CSV format you will convert this example file to BUFR using the wis2box web-application. First we need to register the station in the wis2box, in this case the station is a fictional station located on the island of Sicily in Italy. Navigate to the station list page, click add station and then search (leave the WIGOS Station Identifier box empty). Click create new station and enter the fictional station details, suggested details are below:
| Field | Value |
|---|---|
| Station name | Monte Genuardo |
| WIGOS station identifier | 0-20000-0-99100 |
| Traditional identifier | 99100 |
| Longitude | 13.12425 |
| Latitude | 37.7 |
| Station elevation | 552 |
| Facility type | Land (fixed) |
| Barometer height above sea level | 553 |
| WMO Region | VI |
| Territory or member operating the station | Italy |
| Operating status | operational |
Select the appropriate topic, enter the collections/stations token previously created and click save. You are now
ready to process data from this station. Navigate to CSV to BUFR submission page on the the wis2box web-application
(http://<your-host-name>/wis2box-webapp/csv2bufr_form).
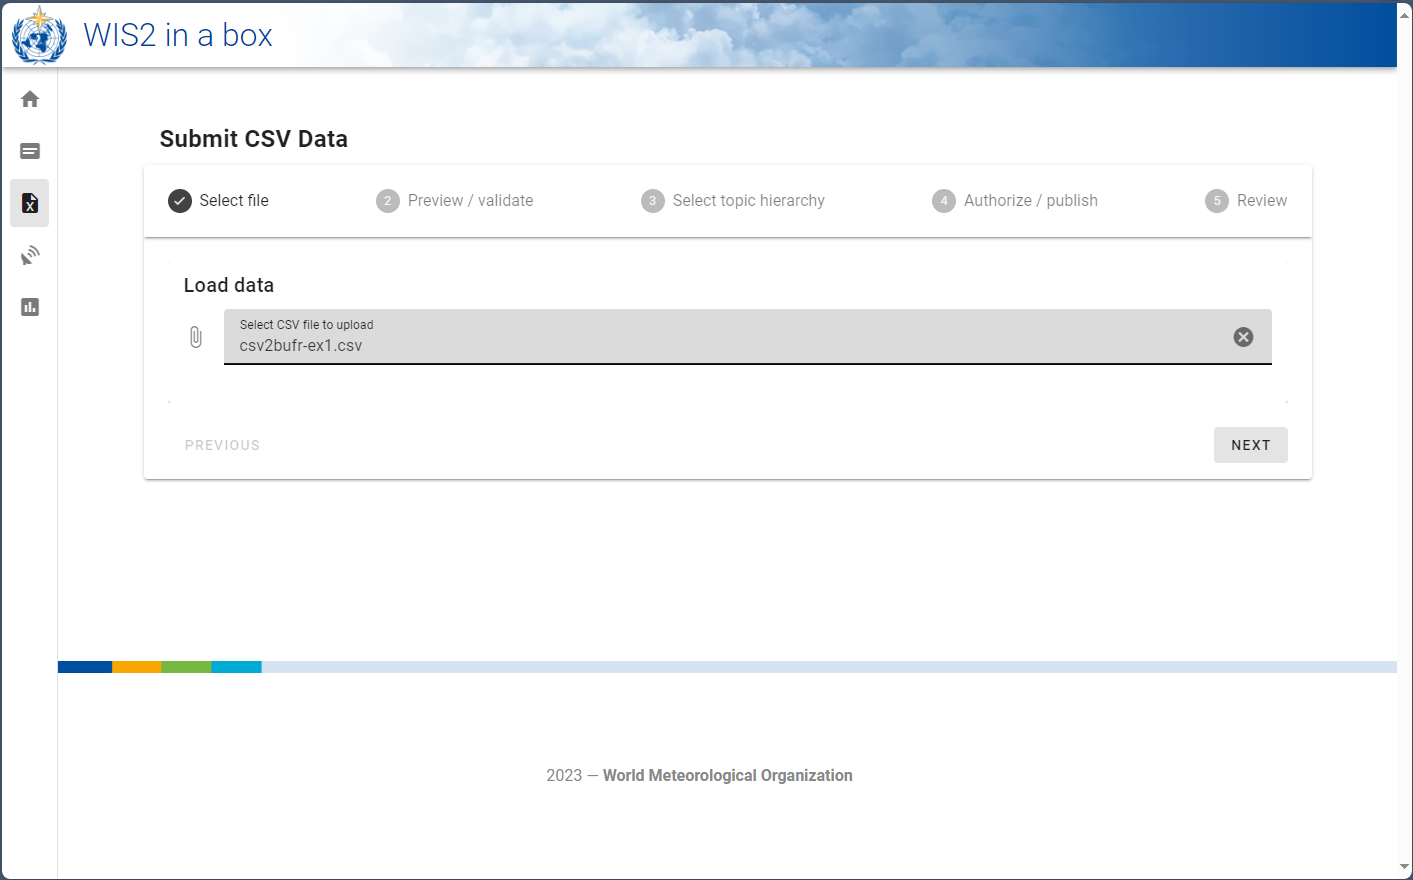
Click the entry box or drag and drop the test file you have downloaded to the entry box.
You should now be able to click next to preview and validate the file.
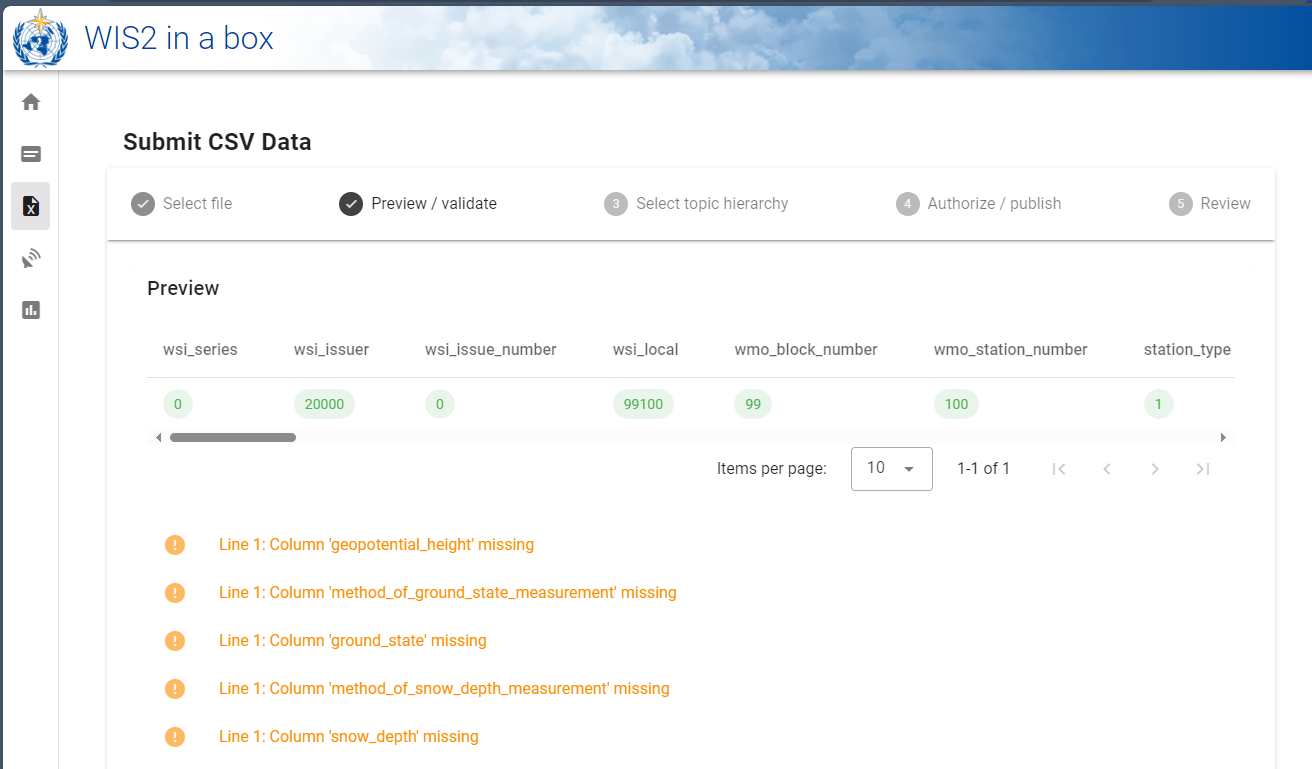
Clicking the next button loads the file into the browser and validates the contents against a predefined schema. No data has yet been converted or published. On the preview / validate tab you should be presented with a list of warnings about missing data but in this exercise these can be ignored.
The next button will take you to the topic selection page,
as with the FM-12 SYNOP to BUFR page select the topic configured for "surface weather observations" on your wis2box
and click next. You should now be on an authorisation page where you will be asked to enter the processes/wis2box
token you have previously created. Enter this token and click the "Publish on WIS2" toggle to ensure
"Publish to WIS2" is selected (see screenshot below).
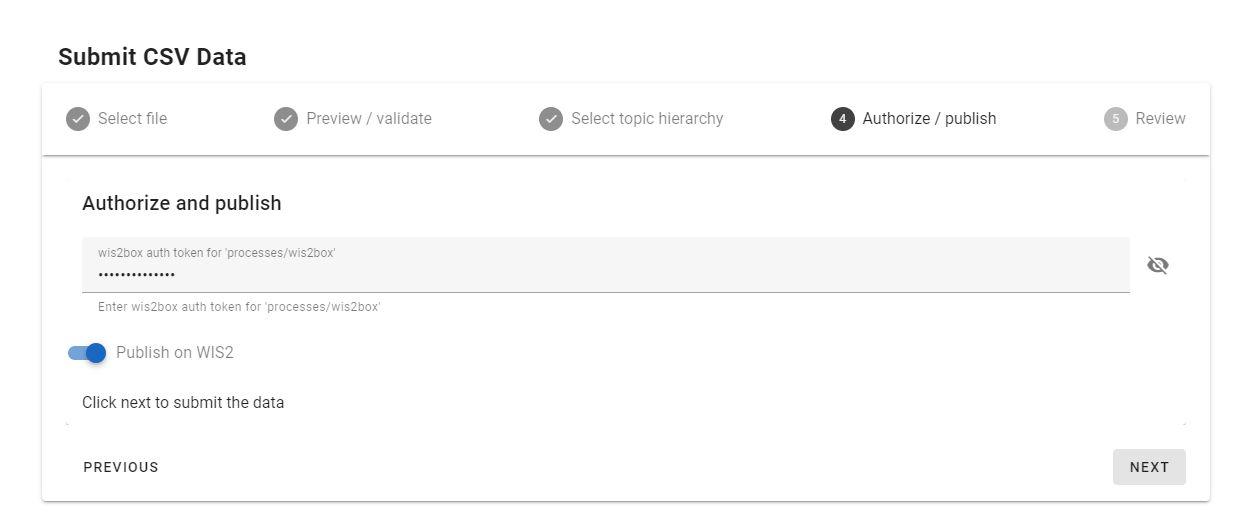
Click next to transform to BUFR and publish, you should then see the following screen:
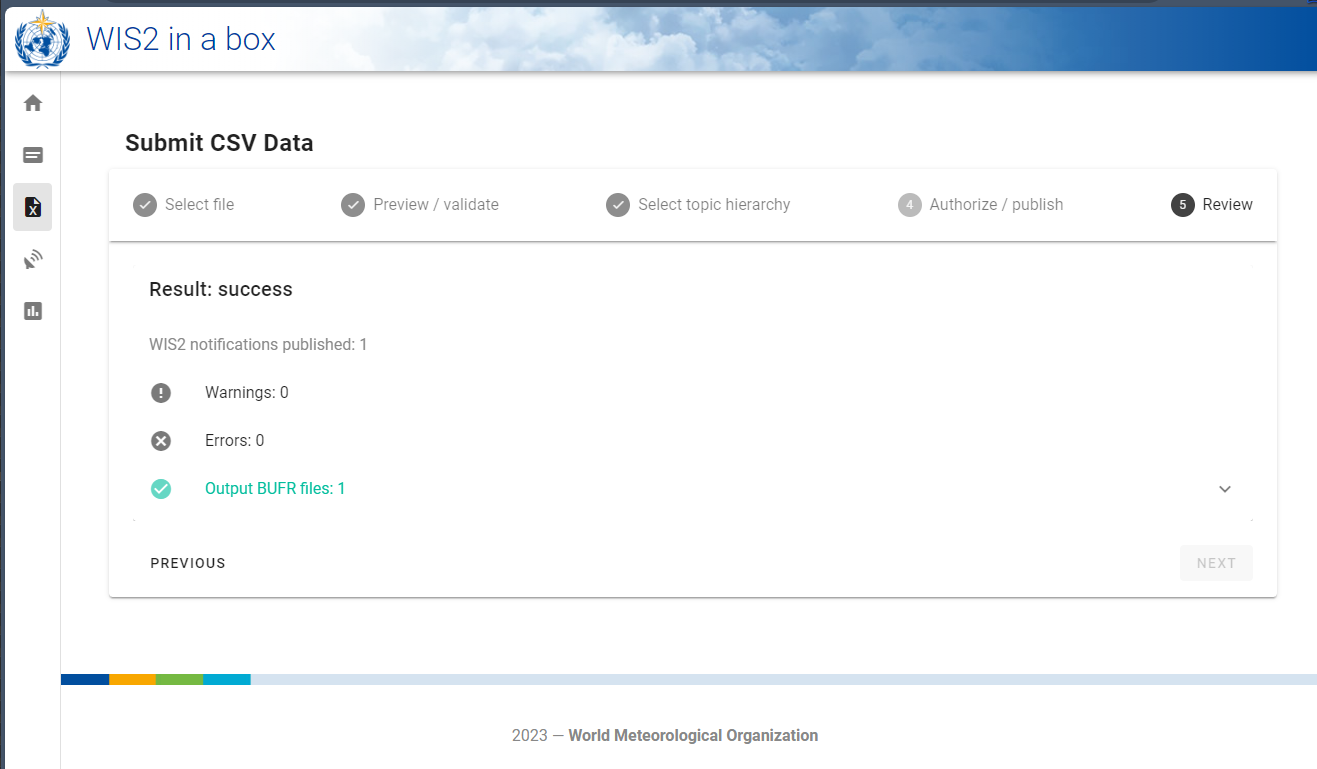
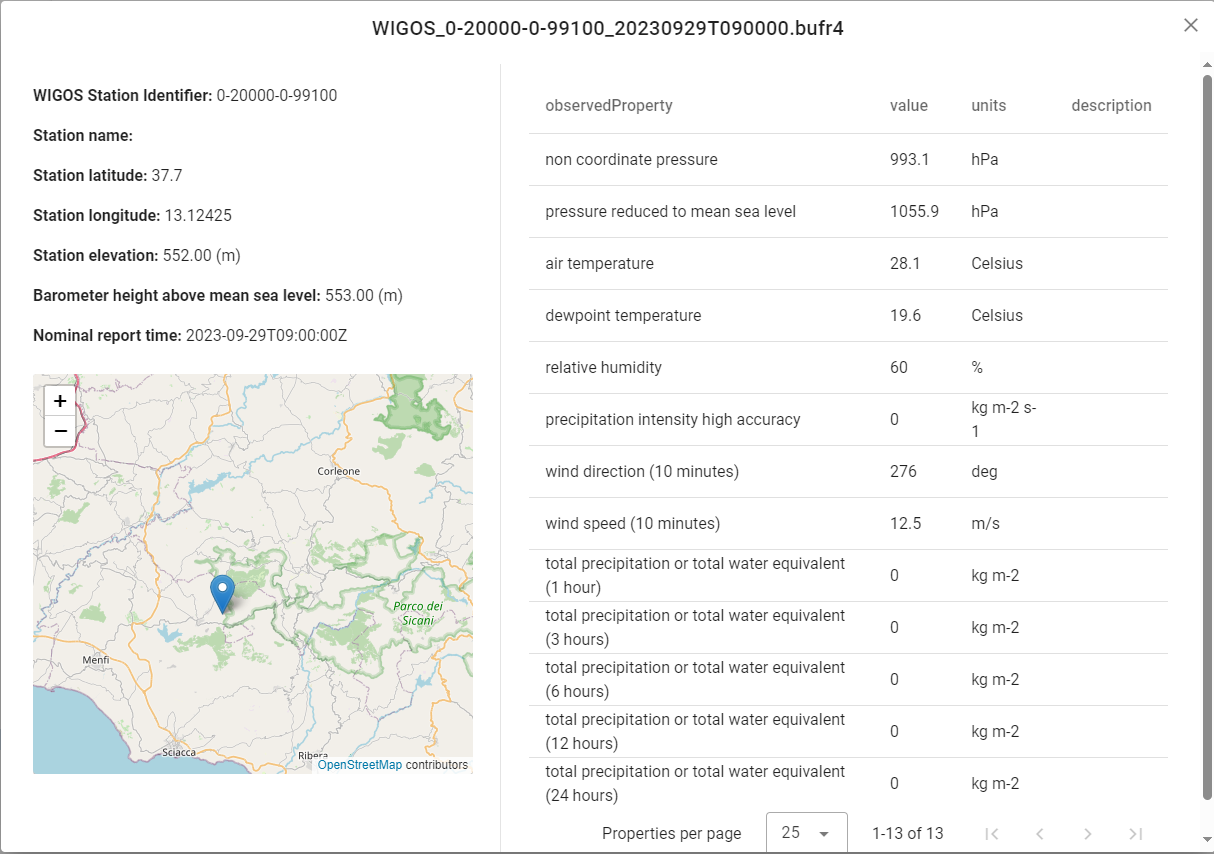
Clicking the down arrow tn the right of Output BUFR files should reveal the Download and Inspect buttons.
Click inspect to view the data and confirm the values are as expected.
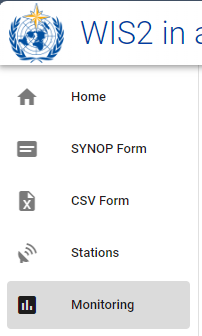
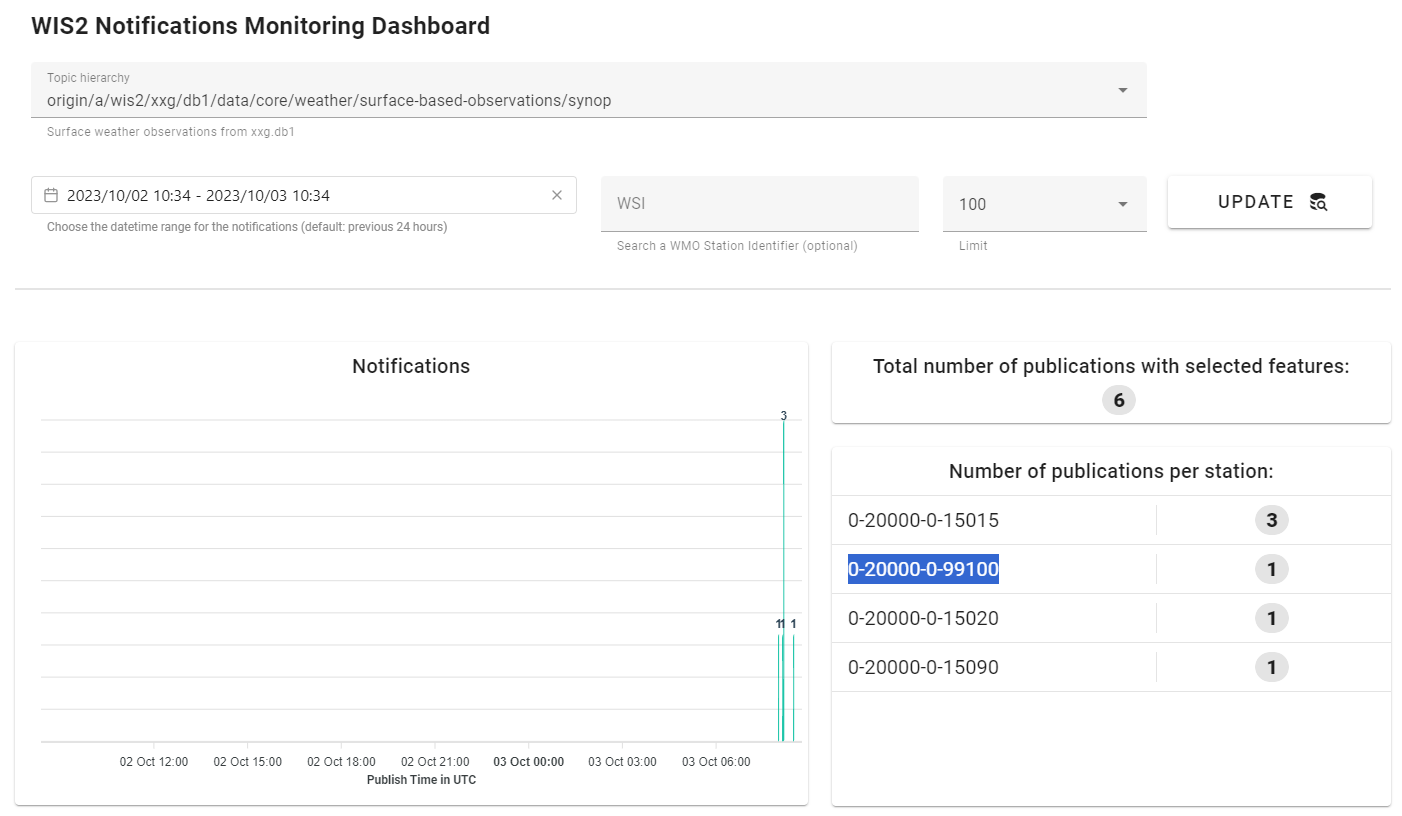
As a final step navigate to the monitoring page from the left menu.
Select the topic you have been publishing on from the dropdown menu and click update, you should see the message you have just published (and possibly notifications from the synop2bufr session). An example screenshot is shown below:
Success
Congratulations you have published you first csv data converted to BUFR via the wis2box.
You should also be able to see these notifications in MQTT Explorer.
Exercise 3 - debugging the input data
In this exercise we will examine what happens with invalid input data. Download the next example file by clicking the link below. This contains the same data as the first file but with the empty columns removed. Examine the file and confirm which columns have been removed and then follow the same process to convert the data to BUFR.
Question
With the columns missing from the file were you able to convert the data to BUFR? Did you notice any change to the warnings on the validation page?
Click to reveal answer
You should have still been able to convert the data to BUFR but the warning messages will have been updated to indicate that the columns were missing completely rather than containing a missing value.
In this next example an additional column has been added to the CSV file.
Question
Without uploading or submitting the file can you predict what will happen when you do?
Now upload and confirm whether your prediction was correct.
Click to reveal answer
When the file is validated you should now receive a warning that the column index
is not found in the schema and that the data will be skipped. You should be able to click
through and convert to BUFR as with the previous example.
In the final example in this exercise the data has been modified. Examine the contents of the CSV file.
Question
What has changed in the file and what do you think will happen?
Now upload the file and confirm whether you were correct.
Click to real answer
The pressure fields have been converted from Pa to hPa in the input data. However, the CSV to BUFR converter expects the same units as BUFR (Pa) and, as a result, these fields fail the validation due to being out of range. You should be able to edit the CSV to correct the issue and to resubmit the data by returning to the first screen and re-uploading.
Hint
The wis2box web-application can be used to test and validate sample data for the automated workflow. This will identify some common issues, such as the incorrect units (hPa vs Pa and C vs K) and missing columns. Care should be taken that the units in the CSV data match those indicated above.
Bug
Please note, due to a bug in the current version of the web-application you may need to reload the page before resubmitting the data.
Exercise 4 - potential web-application and API issues
Before the web-application can be used to submit data the topic hierarchy, on which to publish, the authorisation token and the stations need to be configured. This can be demonstrated with several simple exercises.
For the first example in this exercise download the example file via the link below and publish using the web-application.
Question
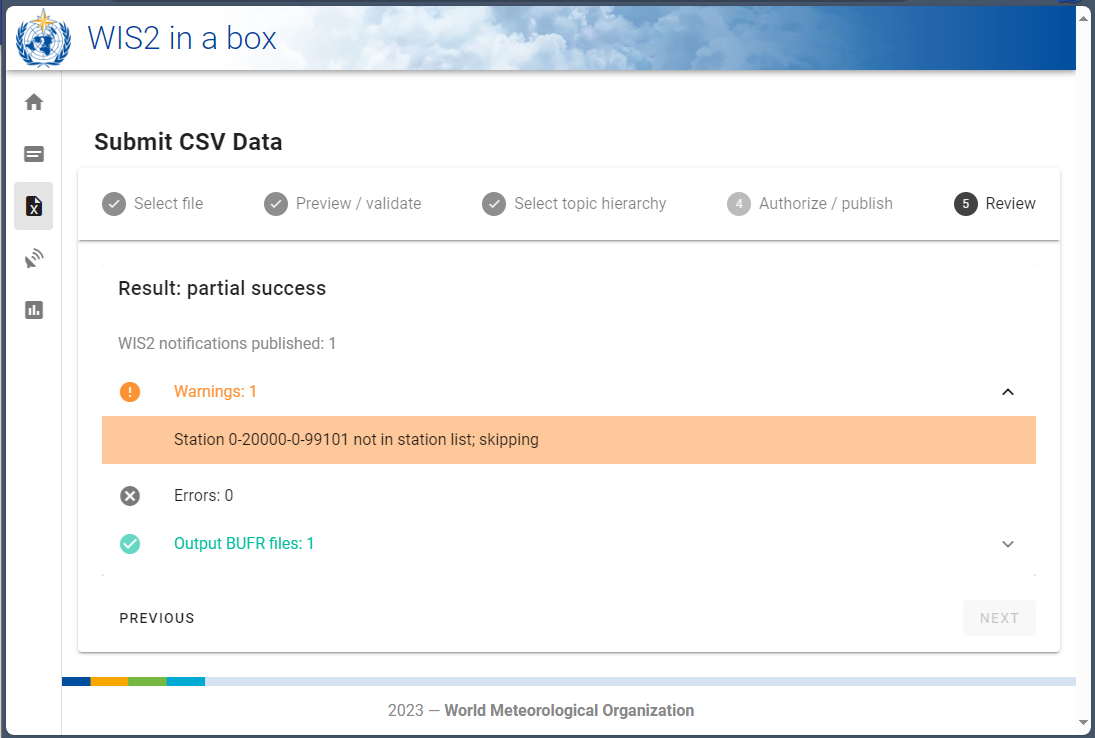
What result do you receive on the "Review page"?
Click to reveal answer
The second row in the file contains data from a station (again fictional) that has not been registered in the wis2box. As a result a warning is given that the station has not been found and that the data have not been published.
For the next example, try submitting the data but without selecting a topic hierarchy on which to publish.
Question
What happens when you try and click next?
Click to reveal answer
You should find the next button greyed out until a valid topic is selected. The options for the topic hierarchy are set based on the discovery metadata registered within the box
For the final example, try entering a token that has not been registered and observe what happens when you click next.
Question
What do you expect will happen if you enter an invalid token?
Click to reveal answer
When you click next you should be taken to the Review page but receive a message that the token is invalid. Navigate to the previous step, enter a valid token and try again.
Housekeeping
As with the FM-12 SYNOP to BUFR exercise you will have registered some new stations within the wis2box. Navigate to the station list and delete those stations as they are no longer required.
Conclusion
Congratulations
In this practical session you have learned:
- how to format a CSV file for use with wis2box web-application
- and how to validate a sample CSV file and to correct for common issues.
Next steps
The csv2bufr converter used in the wis2box has been designed to be configurable for use with any row based tabular data. The column names, delimiters, quotation style and limited quality control can all be configured according to user needs. In this page only the basics have been covered, with a standardised CSV template developed based on user feedback. Advanced configuration will be covered as part of the BUFR command line tools session.